
- Subscribe to RSS Feed
- Mark Topic as New
- Mark Topic as Read
- Float this Topic for Current User
- Bookmark
- Subscribe
- Printer Friendly Page
How to configure the EX6200 to your WI-FI router using ethernet connection and use Smart Setup !
- Mark as New
- Bookmark
- Subscribe
- Subscribe to RSS Feed
- Permalink
- Report Inappropriate Content
How to configure the EX6200 to your WI-FI router using ethernet connection and use Smart Setup !
- Existing network name. MyNetworkName
- New extended 2.4 GHz network name. MyNetworkName_2GEXT
- New extended 5 GHz network name. MyNetworkName_5GEXT
Note: After you have set up the extender, you can also connect Ethernet-enabled devices such as gami...
To setup the EX6200:
- Place the extender close to the Wi-Fi router.
- Plug the extender into an electrical outlet.
- If necessary, press the Power button. The Device to Extender LED and the two Link Rate LEDs light am...
- Make sure that your computer is not connected to a Wi-Fi network or Ethernet network. If the compute...
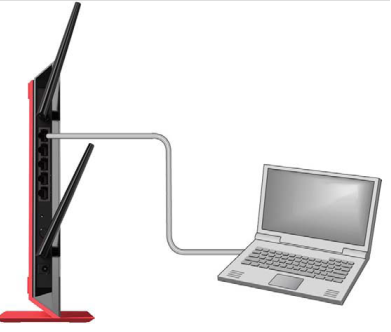
- Connect your computer to the extender with an Ethernet cable. You can use any of the five Ethernet L...
- If you have trouble connecting, try the following:
- Open a web browser window from the same computer. The browser takes you directly to the NETGEAR geni...
Note: If you are not automatically directed to the NETGEAR genie screen, go to www.mywifiext.net, and enter adminfor the user name and password for the password.
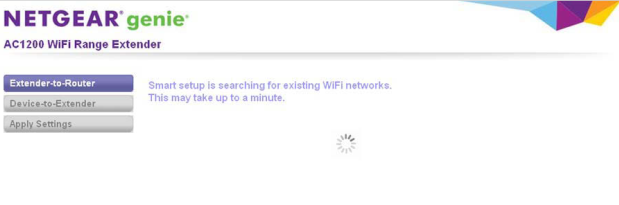
Smart Setup searches for existing Wi-Fi networks automatically and displays the networks in the 2.4 GHz band.
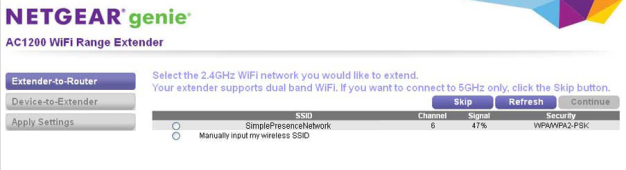
- Select a 2.4 GHz Wi-Fi network to extend, and click Continue.
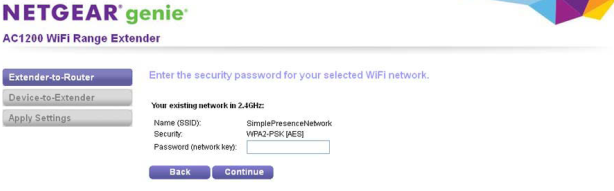
- Enter the security settings for the existing 2.4 GHz network:
- If the network uses WPA-PSK, WPA2-PSK, or a combination of these options, do the following:
- In the Password (network key) field, type the network passphrase (also called a password or network key).
- Click Continue.
- If the network uses WEP, do the following:
- From the Encryption Strength menu, select the encryption strength (64 bit or 128 bit).
- Select the radio button that corresponds to the key that you want to use (Key 1, Key 2, Key 3, or Key 4).
- Next to the selected radio button, enter the network WEP key.
- Click Continue.
If NETGEAR genie detects any networks in the 5 GHz band, it displays them.

- Select a 5 GHz Wi-Fi network to extend, and click Continue.
Note: If your router does not support the 5 GHz band (not all routers do) or you want to set up the 5 GHz extender network later, click the Skip button, and go to Step 12.

- Enter the security settings for the existing 5 GHz network:
- If the network uses WPA-PSK, WPA2-PSK, or a combination of these options, do the following:
- In the Password (network key) field, type the network passphrase (also called a password or network key).
- Click Continue.
- If the network uses WEP, do the following:
- From the Encryption Strength menu, select the encryption strength (64 bit or 128 bit).
- Select the radio button that corresponds to the key that you want to use (Key 1, Key 2, Key 3, or Key 4).
- Next to the selected radio button, enter the network WEP key.
- Click Continue.
NETGEAR genie displays the network names and adds _2GEXT to the end of the 2.4 GHz network name and _5GEXT to the end of the 5 GHz network name.

- Use the default extension names or enter new network names for your extender Wi-Fi networks and click Continue.
Note: If you do not want to use the same security modes for your extender networks as you use for your existing networks, clear the check box before you click Continue. You then can configure the security settings for the extender networks.
The extender applies the settings.

- Wait a couple of minutes while the extender creates the Wi-Fi networks. When the extender is ready, NETGEAR genie summarizes the extender networks.

- Use a Wi-Fi network manager on the computer or mobile device to connect to the extender’s newly created 2.4 GHz or 5 GHz Wi-Fi network.
Note: Unless you entered a new network name in Step 12, the extender changes its default NETGEAR_EXT network name to the name of the Wi-Fi network to which you connected the extender and adds _2GEXT to the end of the 2.4 GHz network name and _5GEXT to the end of the 5 GHz network name.
- Select My wireless devices are connected to the Extender network and click Continue.
NETGEAR genie describes the color of the Link Rate LED on the front of the extender. Because you placed the extender close the Wi-Fi router, the Link Rate LED is green.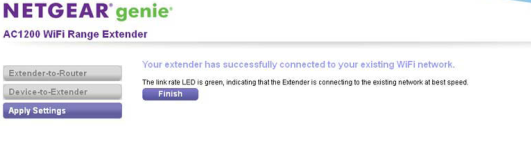
- Click Finish. A pop-up screen displays.
- To bookmark the URL of the extender, click OK.
- If you are prompted to enter a user name and password, type admin for the user name and password for the password.
The NETGEAR registration screen displays. You are now online. - To register the extender, enter your information in the fields onscreen and click Register. A messag...
- Close your browser.
- Disconnect the Ethernet cable from the computer and the extender.
- Now that the extender is connected to the Wi-Fi router and you can connect a computer or mobile device to the extender’s Wi-Fi network, move it to a location where you can boost your Wi-Fi range. The location you choose must be within the range of your existing Wi-Fi router network.
- Plug the extender into an electrical outlet at the new location and restart the extender. Unless the extender is outside the range of your Wi-Fi router, the extender connects automatically to the Wi-Fi router. The Link Rate LEDs help you choose a spot where the extender-to-router connection is optimal. The following tables describe how the LEDs show the quality of the connection.

If the Link Rate LED is off, the extender cannot connect to the Wi-Fi router. If the Link Rate LED is red, the extender has a poor connection to the Wi-Fi router.
- If the extender has no connection or a poor connection, move the extender closer to your Wi-Fi router and try again until the 2.4 GHz or 5 GHz Link Rate LED is green, or at least amber.
- Use a Wi-Fi network manager on the computer or mobile device to reconnect to the extender’s Wi-Fi network.
Note: Unless you entered a new network name in Step 12, the extender changes its default NETGEAR_EXT network name to the name of the Wi-Fi network to which you connected the extender and adds _2GEXT to the end of the 2.4 GHz network name and _5GEXT to the end of the 5 GHz network name.
- Select the new network and use your Wi-Fi router password to connect. You are now using your extended Wi-Fi network.
- Mark as New
- Bookmark
- Subscribe
- Subscribe to RSS Feed
- Permalink
- Report Inappropriate Content
Re: How to configure the EX6200 to your WI-FI router using ethernet connection and use Smart Setup !
Setup for an i5 laptop running OS 10. In 14 months, I never did get good speed when my laptop was located 32' from my modem. I just bought a new Motorola MG7315 modem which increased signal strength but the range extender didn't do any good. I had a problem initially connecting to the range extender with the new modem but I resolved that issue. I contacted Netgear support a year ago when I bought this expensive (at the time) extender. This is what I got from support and my response:
| ||
|


• What is the difference between WiFi 6 and WiFi 7?
• Yes! WiFi 7 is backwards compatible with other Wifi devices? Learn more