NETGEAR is aware of a growing number of phone and online scams. To learn how to stay safe click here.
Forum Discussion
EHCanadian
Jan 31, 2020Star
[Tutorial] How to install your own Linux OS - ReadyNAS 424
How to install your prefered Linux distro on a ReadyNAS 424.
This install requires you to dismantle the readynas 424. There is a ribbon cable
attached to the bottom front that is used for the lcd display. Care must be be taken.
Use a towel and lay it under the board when you have it taken apart.
During my discovery process, my readynas had no 3.5" drives in the unit. It was
then factory reset using the rear reset button and I selected the factory reset
option using the front display buttons.
At the preparation process the readynas unit had ReadyNAS v6.10.2 installed.
The hard drives had no data on them. The readynas could not raid 5 itself over my four
drives so I did not have to worry about the readynas os being on the hard disks
and causing potential interfering with this process. You should now be at the
same scenario to fallow the following steps. The system will try to boot from
the old RAID or daughter board. So we need to alter this, You end up in a stalled
syslinux prompt with the readynas. We need the daughter board functional and
reconfigured as it will no boot from any usb media. This is our jump-start to
point the existing syslinux boot manager to where we want it to boot from, It then
tries to boot from the raid/hard drives so we don't want a os on that ether.
This is why we use the m.2 port, If you have a vga, hdmi or dvi output you can
just setup a video monitor enter the bios and be on your way.
If your device has internal storage that can not be removed then this may not
work for you as you might have to use the usbrecovery tool and load your edits
on the drive as the init script copies the content of the flash drive to the
internal flash. But once the edits are made and if you mess up you may not be
able to recover from this as the device boot up sequence is hard-coded to boot
from the internal flash first. If the syslinux is incorrect then your unit sits at a syslinux
prompt that you can not interact with.
I tested the daughter board boot process with another machine that had its bois
settings all disabled for boot media excluding the board itself to see what it was
actually doing. This was see why my usb flash drives didn't boots did not do
anything like a normal x86_64 machine would boot from.
Turns out it always extracts root.tlz from the internal flash to the hard drives if it can
find a /data|/root mount point. If not then it boots to the readynas web interface that
contains a warning. This was prior to the edits.
Things you will need.
01. M.2 2280 drive (32gb+)
02. Access to a 9 pin usb header port from another machine
(Used a full integrated motherboard)
03. A modern usb flash drive.(Used a lexar 64gb 3.0 flash drive)
04. Access to an existing operating system with a available usb port.
05. VNC Viewer/Client (Used version 6)
06. Precision Phillips screwdriver
07. Hot glue stick (Used a hot glue gun)
08. NetInstall iso of your preferred Linux
09. RuFUS (I used the portable version)
10. Notepad++ (If you are on windows os)
Here we go..
01. Shutdown the ReadyNAS
02. Unplug the power from the readynas
03. Unplug the ethernet cable and any existing usb/esata devices.
04. I removed the cmos battery as well.
05. Remove the screws from the unit with your Phillips screwdriver.
(Avoid stripping them. You do not need to remove the larger screws as they are
for the fan itself)
06. You should be able to work the cover off. The metal cover comes off
upwards after you nudge the cover backwards. The unit has metal tabs
in the front of it that slide under the plastic front. Hence the nudge backwards.
07. You now have to remove the back plate. This is where the handle and fan is.
The fan is connected to the raid card so take your time and gently unplug the 4
pin connector from its fan socket on the raid card.
08. Turn the unit on its side so the door hing is upwards and you can use a towel
and lay it under the board so you do no short anything. Take care as there is a
ribbon cable attached.
09. You can now remove the screws that hold the logic board in its place. You will
notice the M.2 port has no stand to secure it. Be careful as the ribbon cable for
the lcd attached, its white and you can't see it initially as the connector is
facing inwards. There is also a blue usb connector and the power button pins.
Slowly flip it so you can lay the board down on that towel.
10. Now we need to remove the daughter board. It has a Phillips screw holding it
in place. Remove the screw. Lift the board upwards and it will come off.
11. Now we need to go the machine that has that 9 pin usb header on the motherboard
and plug it in. I turned my machine off to do this. I had to orientate the daughter
board so the pin connector was the closest to the port. Since the daughter board does
not have the header block pin and you will notice the machine usb header port has one
pin missing, we have to orientate the board so the length is facing away from the
missing pin on the motherboard. Try to avoid resting the daughter board on any
electrical metal. Power on the machine. You know you got it in the right direction
as you will see the led flash green during the system boot.
12. Now we need to flash the flash drive with our prefered iso. I use RuFUS. Make
note of the label as we will need that label. Make sure no spaces exist in the label
name. Some iso's have a autorun.inf with an existing name that windows may show that
you did not label as such and can be ignored, But we need to refer to the flash
drive label name so no spaces. Keep it simple. It can not be blank. Do not flash the
daughter board. Flash the flash drive. Note the drive letters when excuting a step.
13. Now we need to use the content on the daughter board. Under windows os it was
mounted as a fat32 device and had 256mb of flash storage. Navigate to the drive. We
are going to copy everything on that drive and keep a backup. Once you copy the drive
contents and have a backup you won't delete by mistake we are going to use notepad++
under windows as we need the LF that Linux and mac uses for editing the boot loader
files. Open syslinux.cfg with notepad++. Yours should look like the below.
serial 0 115200 0

timeout 30

prompt 1


default Normal


label Normal

kernel kernel

append initrd=initrd.gz reason=normal


label FactoryDefault

kernel kernel

append initrd=initrd.gz reason=factory


label OSReinstall

kernel kernel

append initrd=initrd.gz reason=os_reinstall


label TechSupport

kernel kernel

append initrd=initrd.gz reason=diag


label SkipVolCheck

kernel kernel

append initrd=initrd.gz reason=skip_fsck


label MemoryTest

kernel memtest


label TestDisks

kernel kernel

append initrd=initrd.gz reason=test_disks
We are replacing it with this.
serial 0 115200 0

timeout 0

prompt 0


default CentosFlash


label Normal

kernel kernel

append initrd=initrd.gz reason=normal


label FactoryDefault

kernel kernel

append initrd=initrd.gz reason=factory


label OSReinstall

kernel kernel

append initrd=initrd.gz reason=os_reinstall


label TechSupport

kernel kernel

append initrd=initrd.gz reason=diag


label SkipVolCheck

kernel kernel

append initrd=initrd.gz reason=skip_fsck


label MemoryTest

kernel memtest


label TestDisks

kernel kernel

append initrd=initrd.gz reason=test_disks


label CentosFlash

kernel x/vmlinuz

append initrd=x/initrd.img inst.vnc inst.vncpassword=password inst.headless ip=dhcp inst.stage2=hd:LABEL=CENTOS-8-1 nomodeset
Edit - EOL - Unix - Save
Now we need to copy the flash drive boot data to the new folder we will name the
folder x and the contents of flashdriveletter:\isolinux\ need to be copy and pasted
to the x folder on the daughter board. so daughterboardletter:\x\(content)
We now have to edit the isolinux.cfg in the flashdriveletter:\isolinux\ folder.
This is a example. Do not use this if you are going to install Debian 10.2. Use this
as a example and strip out the extra text content as with a headless install, We can't
interact with the boot menu so we need only the menu entries that will continue the auto
booting.
serial 0 115200 0

default vesamenu.c32

timeout 4


display boot.msg


# Clear the screen when exiting the menu, instead of leaving the menu
displayed.

# For vesamenu, this means the graphical background is still displayed without

# the menu itself for as long as the screen remains in graphics mode.

menu clear

menu background splash.png

menu title CentOS Linux 8

menu vshift 8

menu rows 18

menu margin 8

menu helpmsgrow 15

menu tabmsgrow 13


# Border Area

menu color border * #00000000 #00000000 none


# Selected item

menu color sel 0 #ffffffff #00000000 none


# Title bar

menu color title 0 #ff7ba3d0 #00000000 none


# Press [Tab] message

menu color tabmsg 0 #ff3a6496 #00000000 none


# Unselected menu item

menu color unsel 0 #84b8ffff #00000000 none


# Selected hotkey

menu color hotsel 0 #84b8ffff #00000000 none


# Unselected hotkey

menu color hotkey 0 #ffffffff #00000000 none


# Help text

menu color help 0 #ffffffff #00000000 none


# A scrollbar of some type? Not sure.

menu color scrollbar 0 #ffffffff #ff355594 none


# Timeout msg

menu color timeout 0 #ffffffff #00000000 none

menu color timeout_msg 0 #ffffffff #00000000 none


# Command prompt text

menu color cmdmark 0 #84b8ffff #00000000 none

menu color cmdline 0 #ffffffff #00000000 none


# Do not display the actual menu unless the user presses a key. All that is displayed is a timeout message.


menu tabmsg Press Tab for full configuration options on menu items.


menu separator # insert an empty line


label vesa

menu label Install CentOS Linux 8 in ^basic graphics mode

menu default

text help

Try this option out if you're having trouble installing

CentOS Linux 8.

endtext

kernel vmlinuz

append initrd=initrd.img inst.vnc inst.vncpassword=password inst.headless ip=dhcp inst.stage2=hd:LABEL=CENTOS-8-1 nomodeset


menu separator # insert an empty line


label local

menu label Boot from ^local drive

localboot 0xffff


menu separator # insert an empty line


label returntomain

menu label Return to ^main menu

menu exit


menu end
Edit - EOL - Unix - Save
Now we can shut down the machine we used that has the daughter board in and remove
the drive. We are also taking the flash drive.
Now we place that daughter board back into the readynas. Note the it only sits
correctly one way and the screw hole should alight with the daughter board.
Place the flash drive in the usb port in the rear as the front one is a pain in
the rear.
Grab that m.2 drive that doesn't contain anything. Should be blank. Mine was.
Insert the m.2 drive and heat up the glue stick and gently dab the mount hole with
it so it holds it in place. Keep it held down for a moment untill it hardens.
Now we can release the pressure, if it doesn't lift back up you are good to reconnect
the ethernet cable and power. The unit will turn on and in a moment or two it will
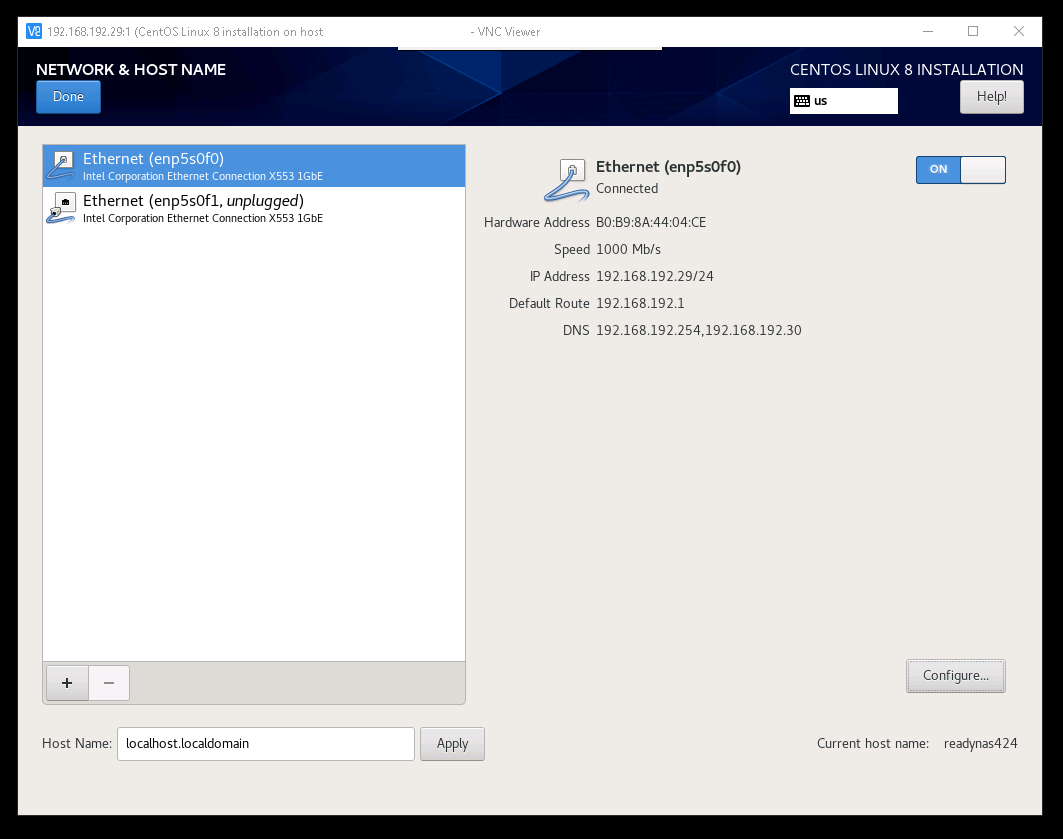
load from the flash drive and will await your vnc viwer connection. At this point you
need to know the ip address of the readynas as the lcd display is useless at this time.
So login into to your router and find the address if you do not know the ip or have
set a dhcp entry. Example, In the vnc viewer I typed in 192.168.192.29:1 and was prompted
with a authentication prompt and entered in password and that about sums it up.
You now have a graphic installer to cleanly install the os. Do not touch the daughter
board or internal partition. You must create a /boot partition on the m.2 drive.
I used the classic partition setup
/boot = exf2|500 MiB
/swap = swap|500 MiB
/ = exf2| left the installer feild empty and it used the remaining space
At this point, once the installer told me it was finished I pressed the restart
button on the installer and once the readynas rebooted I unplugged the power cord
and removed the daughter board. I then plugged the power back in and verified I
could SSH into the unit using Bitvise SSH Client for windows. You now have a functional
device. I put the daughter board in a anti static bag and stored it inside the unit
with some tape for the future.
At this point you can restore the daughter board syslinux.cfg back to stock. Do
not place the daughter board back in the unit without altering the syslinux.cfg as
it will just boot loop or idle at a boot command prompt you can't interact with.
The readynas will always boot from that daughter board or internal flash first so
if you want to keep it in the unit you will have to edit the syslinux.cfg and add
another entry for it to boot from the m.2 drive.
I was never sucessfull in the menu options showing up in the readynas boot menu
lcd selection. I tried the tech support mode and mounted the daughter board but
even with a telnet and enabling dropbear to use bitvise ssh and even chroot the
menu option edits never showed up on the display. The only boot partition is on
the m.2 drive and if I want to switch the Linux os I will need that daughter board
in the future to headless install. It also allows me to factory reset the unit back to
readynas os to redo the process again. Its my version of a fail safe.
You can now plug in your hard drives into the bays and give them a software
raid partion. Installing webmin pacakge would be a useful tool to help manage some
of the os settings. You will not have access to the readynas os features.
Replies have been turned off for this discussion
Related Content
NETGEAR Academy

Boost your skills with the Netgear Academy - Get trained, certified and stay ahead with the latest Netgear technology!
Join Us!
