NETGEAR is aware of a growing number of phone and online scams. To learn how to stay safe click here.
Forum Discussion
elian1
Aug 09, 2006Aspirant
ReadyNV: Can´t get out the Tray...
Hi Folks,
seems to me i´m stupid. Due to a diskfailure i like to replace a HardDisk#2. But I can´t get the Tray out. Tried to push the Button and tried to do it with a paper clip. No latch comes out. It don´t even moves for one inch.
Any Trick or Idea?
Thanx!
seems to me i´m stupid. Due to a diskfailure i like to replace a HardDisk#2. But I can´t get the Tray out. Tried to push the Button and tried to do it with a paper clip. No latch comes out. It don´t even moves for one inch.
Any Trick or Idea?
Thanx!
92 Replies
Replies have been turned off for this discussion
 EleanorDInitiateI too have had this problem, but luckily I was eventually able to remove both disks from my ReadyNas. I stripped the latches off of the tray, but unfortunately broke one of them when I was trying to release the mechanism with a paper clip - you have to be careful, as the actual latch clip itself is made of quite flimsy plastic. Assuming you can get the trays out, you should try lubricating the mechanism with silicone spray first and then work on the sliding 'tabs' to the left and right hand side of the latch as viewed from the 'inside' (i.e. the face of the latch that is normally against the metal tray), rather than on the latch clip itself.
Next day, for my second tray, I bought some silicone and sprayed it all over the latch mechanism from the inside, and on the button from the outside - it now works perfectly.
My ReadyNAS is 6 months out of it's 3-year hardware warranty. So I e-mailed Netgear to ask how much it would be to buy a new tray. I mentioned in the e-mail that I had looked up the forums and found this was a well-documented flaw with ReadyNAS latches. To my surprise, Netgear Support immediately offered to replace the broken tray completely free of charge, without so much as a quibble. That's what I call service ! jnicitaAspirantOnce my disks were out, I just took a channel lock, grabbed the entire assembly that supports the round button, and pulled it off . Pulled all the crap out and tossed it in the trash. The lever still comes down and locks the drive, but the mechanism that secures the lever is right there where the button used to be, any type of lever can be used to push the mechanism up and they pop right up. I happen to use a old pen, but it makes it simple and I dont ever need to worry about lubing this or messing with that. its just so much easier.
-John Mr_BGuide
I thought i explained just why lubricating this is a bad idea... But go ahead, have fun.EleanorD wrote: Assuming you can get the trays out, you should try lubricating the mechanism with silicone spray first and then work on the sliding 'tabs' to the left and right hand side of the latch as viewed from the 'inside' (i.e. the face of the latch that is normally against the metal tray), rather than on the latch clip itself.
Next day, for my second tray, I bought some silicone and sprayed it all over the latch mechanism from the inside, and on the button from the outside - it now works perfectly.
B!- idehallAspirant
johns wrote: All of 'em.
I just installed 4 new disks in a ReadyNAS NV+ and none of the trays would release with the button.
As far as I am aware, no one has touched it since it was purchased.
The paper clip did the trick, but it would be lovely if there were more information in the KB regarding this.  maxblackAspirant
idehall wrote: I just installed 4 new disks in a ReadyNAS NV+ and none of the trays would release with the button. As far as I am aware, no one has touched it since it was purchased. The paper clip did the trick, but it would be lovely if there were more information in the KB regarding this.
Funny idehall that you would bump this thread now. I'd bought an extra drive, and replacement tray, with my NV+ way-back-when and just yesterday looked at my brand-new tray (with round button). With no drive installed, the thing worked once and then stuck. Yeah I could toothpick-release the latch, but the button simply stopped working.
"More information in the KB"? There is NO info in the kb, but if you look hard enough you find this thread, where posts are missing the images and so don't make much sense.
What an over-designed, under-performing mess that round-button design is. And now I'm stuck with it... :( PapaBear1ApprenticeI have found that exercising the release mechanism about a half dozen times or so will wear off the molding lines that are causing the problem. It is best to do this when it is not installed as then you can also get to the release from the back side. My 4 1/2 year old NV+ had that problem after sitting for years with the original drives in it, but now that I exercised the release mechanisms then and the fact that they have been used another half dozen times in service in the last two years, they tend to be a little stiff, but do release. The ones with the square openings you can get your finger in are a lot better. They come on all the new units, and I believe the more recent Duo (v1) and NV+ (v1) as well.
I am suspicious that the supply chain of replacement NV/NV+ trays are still the round button design.- magi1AspirantI just want to say
a) wow do I ever have this problem
b) thanks for this thread
c) if this were easier to find, linked from the KB, still included pictures, etc, that would be helpful.
I just decided to upgrade the drives my ReadyNAS NV (original model, still humming along just fine). I tried pushing the latch-release button, and nothing happened. I googled around, found the owner's manual with some ironically optimistic prose about how easy it is to add new disks, but nothing about how to remove stuck ones, then eventually found this thread, tried the paperclick trick, and it worked.
All four of my drive sleds are completely stuck; no amount of wiggling the various components (even after removing them and removing the drive and poking at the mechanism from both sides) seems to unstick it. However, the paperclick trick works fine, so I guess that's how I'll be doing things from now on.
Note that the post from r2-d2 (3rd message in this thread) is supposed to have a picture, but the picture isn't there any more (that post is 5.5 years old!). Thanks to the careful description in words from yoh-dah, I was able to figure it out without the picture. - ScaevolaAspirant
r2-d2 wrote: In below picture, first try to push in pinhole at "A". If this does not work, insert pin at "B", and move pin toward to buttom gently to release latch. This will move plastic block (colored in Cyan) behind front cover.
Please be carefull while using pin.
The attachment didn't come through. As I recall there is a toggle on each of the drives... Trying to remember where the picture is but there is a backup way to pop the drive out (it's awkward)... I recall it was on the old site prior to the Netgear Acquisition. - PapaBear1ApprenticeThe images were there until the third party image hosting service shut down. I did not have any problem with my NV+ for the first few months, but after the unit sat for two years running well without any drive problems, my trays became stuck. After using a very small screwdriver instead of paper clip, and exercising the release mechanism several times, the little casting burrs apparently wore off and while not real easy to release, at least good thumb pressure has released all of them over the last 18 months reliably.
- mdgm-ntgrNETGEAR Employee Retiredhttp://www.infrant.com/download/forum/forum-t5286.png wasn't posted on a 3rd party site.
With the migration to the new server links to "www.infrant.com" pages are no longer working. Try infrant.com or www.readynas.com to get e.g.r2-d2 wrote: 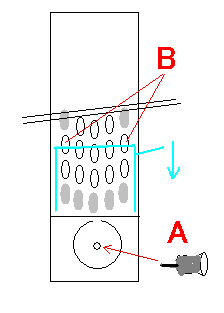
Related Content
NETGEAR Academy

Boost your skills with the Netgear Academy - Get trained, certified and stay ahead with the latest Netgear technology!
Join Us!
