NETGEAR is aware of a growing number of phone and online scams. To learn how to stay safe click here.
Forum Discussion
NASNoob11
Jul 04, 2012Aspirant
Thank you Netgear!
:D I just completed my normal basic install of my new Ultras (u2 and u2+). To say I am flabbergasted would be an understatement! Both of these tiny little toys are truly faster than anything I have ...
PapaBear1
Jul 04, 2012Apprentice
I am not surprised you notice a definite speed difference between the Ultras and your sparc Duo, but to notice a definite speed difference between the Ultras and your ARM based Duo v2 does surprise me a bit.
Backup jobs using NFS/rsync can either be set to push the data by the primary to the backup or pull the data from the primary by the backup. Mine are set to push the data. Each share needs a separate backup job. (I have four) If you are going to push the data, in the fields for Step 1 (Select backup source) use the pull down selection for the share you want to back up. Leave the rest of the fields blank. In the fields for Step 2 (Select Backup Destination) use the pull down selection and select Remote:NFS Server. Then in the host blank, enter either the name you have assigned to the backup NAS or the IP address of the backup NAS. [Note: years ago I decided to use static IP addresses on my NAS units to keep them from changing in case of a change after a shut down of my router. It also makes it easier to identify the IP of the primary unit (192.168.1.201) and the backup unit (202) in a listing. I chose 201 and 202 to keep them out of the normal number assigned by the router. I'm real inventive with names too as I use NAS1 and NAS2 respectively.]
Step 1:
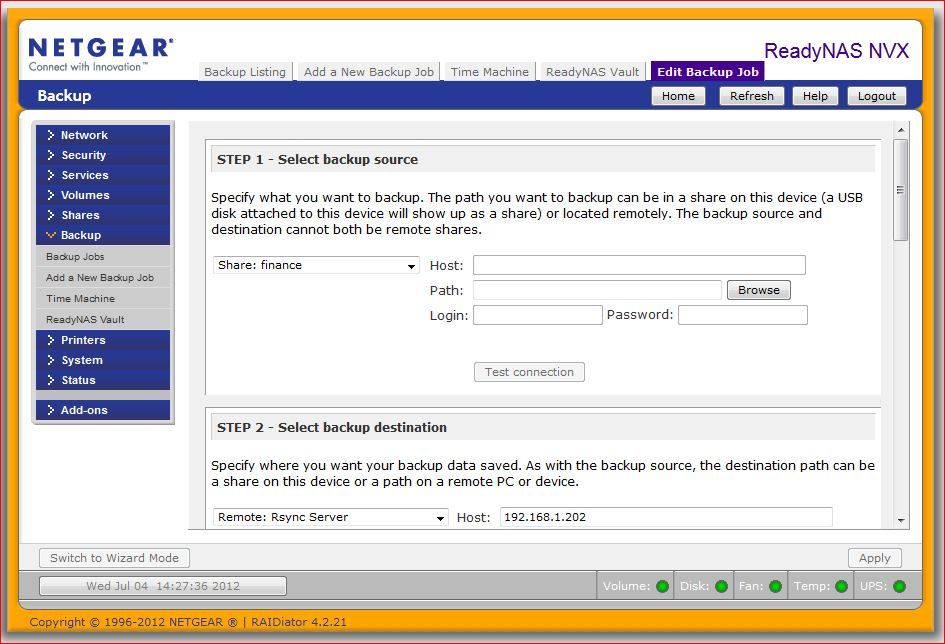
Step 2:

If you would rather pull the data, then the set up in Step 1 would be like I set forth above for Step 2 and the set up in Step 2 would be the simple selection of the share name as I set forth above in Step 1.
In the field for path, enter the share name. While you can back up share a to share b, when I initially set it up I used finance on the primary and bufinance on the backup. When I was doing some updating on my primary I discovered this was not real workable, so now the share names are identical and I back up finance on NAS1 to finance on NAS2. I don't have user ID and passwords set up on my NAS units (user id on PC is two words with a blank in the middle and that does not work on a ReadyNAS which does not like blanks, so I don't have any set). Also note the check box for "remove deleted files on target". If you check this, when the backup job runs, and finds a file has been deleted on the primary, it will then remove the file from the secondary. If you do not check it, the file that was deleted on the original will remain on the backup until you manually remove it or check this box and run the backup job.
When you have completed configuring Step 2, click on the "Test Connection" button. You want to get a message that it was successful in connecting to the backup unit and share. However, unless you have set up the backup unit, you will get an error, unable to connect message. Open Frontview on the backup unit and go to the share listing. Your share listing probably only has settings for CIFS and maybe AFP. You will need to set NFS to read/write and rsync as well. While you are there setting read/write for NFS, note a little lower in the share access restrictions a check box for root enabled hosts. Check the box and enter either the assigned name or IP address of the primary NAS (192.168.1.201 in my case). Then apply and repeat for rsync. Then go back to the tab for your primary NAS and click again on the "Test Connection" button. This time you should get a message that it has successfully connected. You can now go to Step 3 and set the backup schedule for this backup.
If you were going between two x-86 units you can run at least two backup jobs simultaneously (although I don't), but with a sparc based unit, you should limit it to one at a time. When you run the NFS jobs, I would do so manually and not set the schedule. It may take several hours. I have a tendency to set up the backup jobs on the primary, so when I set up the first one, I pulled all the data from my NV+ via an NFS backup job that was started manually for each share. Then I changed it to rsync and ran each job manually again to make sure that the copy was complete. Then I set the unit up to push the backup from my NVX to my NV+ via rsync and ran the jobs again manually. Only then did I set the schedule to run each job in sequence starting at midnight. (Actually 12:05AM) When I got my NVX BE and decided it would be my primary, I shut down my NVX Pioneer, removed the four drives and moved them intact to the BE and booted it (previously set up and updated with a spare disk to update the OS) and it came up intact with the name and IP address unchanged. I then set up the Pioneer with drives removed from my NV+ and did a factory reset and went through the setup again. The second time was much much easier. I had to get help from the forum the first time.
Backup jobs using NFS/rsync can either be set to push the data by the primary to the backup or pull the data from the primary by the backup. Mine are set to push the data. Each share needs a separate backup job. (I have four) If you are going to push the data, in the fields for Step 1 (Select backup source) use the pull down selection for the share you want to back up. Leave the rest of the fields blank. In the fields for Step 2 (Select Backup Destination) use the pull down selection and select Remote:NFS Server. Then in the host blank, enter either the name you have assigned to the backup NAS or the IP address of the backup NAS. [Note: years ago I decided to use static IP addresses on my NAS units to keep them from changing in case of a change after a shut down of my router. It also makes it easier to identify the IP of the primary unit (192.168.1.201) and the backup unit (202) in a listing. I chose 201 and 202 to keep them out of the normal number assigned by the router. I'm real inventive with names too as I use NAS1 and NAS2 respectively.]
Step 1:
Step 2:
If you would rather pull the data, then the set up in Step 1 would be like I set forth above for Step 2 and the set up in Step 2 would be the simple selection of the share name as I set forth above in Step 1.
In the field for path, enter the share name. While you can back up share a to share b, when I initially set it up I used finance on the primary and bufinance on the backup. When I was doing some updating on my primary I discovered this was not real workable, so now the share names are identical and I back up finance on NAS1 to finance on NAS2. I don't have user ID and passwords set up on my NAS units (user id on PC is two words with a blank in the middle and that does not work on a ReadyNAS which does not like blanks, so I don't have any set). Also note the check box for "remove deleted files on target". If you check this, when the backup job runs, and finds a file has been deleted on the primary, it will then remove the file from the secondary. If you do not check it, the file that was deleted on the original will remain on the backup until you manually remove it or check this box and run the backup job.
When you have completed configuring Step 2, click on the "Test Connection" button. You want to get a message that it was successful in connecting to the backup unit and share. However, unless you have set up the backup unit, you will get an error, unable to connect message. Open Frontview on the backup unit and go to the share listing. Your share listing probably only has settings for CIFS and maybe AFP. You will need to set NFS to read/write and rsync as well. While you are there setting read/write for NFS, note a little lower in the share access restrictions a check box for root enabled hosts. Check the box and enter either the assigned name or IP address of the primary NAS (192.168.1.201 in my case). Then apply and repeat for rsync. Then go back to the tab for your primary NAS and click again on the "Test Connection" button. This time you should get a message that it has successfully connected. You can now go to Step 3 and set the backup schedule for this backup.
If you were going between two x-86 units you can run at least two backup jobs simultaneously (although I don't), but with a sparc based unit, you should limit it to one at a time. When you run the NFS jobs, I would do so manually and not set the schedule. It may take several hours. I have a tendency to set up the backup jobs on the primary, so when I set up the first one, I pulled all the data from my NV+ via an NFS backup job that was started manually for each share. Then I changed it to rsync and ran each job manually again to make sure that the copy was complete. Then I set the unit up to push the backup from my NVX to my NV+ via rsync and ran the jobs again manually. Only then did I set the schedule to run each job in sequence starting at midnight. (Actually 12:05AM) When I got my NVX BE and decided it would be my primary, I shut down my NVX Pioneer, removed the four drives and moved them intact to the BE and booted it (previously set up and updated with a spare disk to update the OS) and it came up intact with the name and IP address unchanged. I then set up the Pioneer with drives removed from my NV+ and did a factory reset and went through the setup again. The second time was much much easier. I had to get help from the forum the first time.
Related Content
NETGEAR Academy

Boost your skills with the Netgear Academy - Get trained, certified and stay ahead with the latest Netgear technology!
Join Us!
