NETGEAR is aware of a growing number of phone and online scams. To learn how to stay safe click here.
Forum Discussion
jh901
Jan 08, 2012Aspirant
Ultra 2 PLUS for Squeezebox streaming
Hi I'm looking to upgrade my Duo as it is not handling streaming very well. I understand that perhaps the RAM (or whatever the relevant specs are) is not up to the task. I need more hard drive sp...
PapaBear1
Jan 13, 2012Apprentice
Copy/paste will certainly work, however if you have your files in a share, and want to move the entire share, it is probably better to set up a backup job in Frontview from the duo to the Ultra. The first time can be a little confusing as in anything.
You will need the names or IP addresses of the two. For this reason among others, I always set a static IP address on my units. I set up up high in the range so as to not interfere with the DHCP assignments of the router. The router should skip over static IP addresses on devices, but why push the issue. I have three units, and the fourth number in the sequence, I have set to 201 for the primary NVX, 202 for the backup and 203 for my NV+. When added to the subnet of 192.168.1, my primary unit is thus 192.168.1.201.
Before setting up the backup job, go into Frontveiw on the Ultra 2 Plus and click on the "Shares" button. In the listing of shares, ensure that your shares match the shares you have set up on the Duo. You will have the default CIFS set up, but then click on the NFS icon and change it from disabled to read/write (or just write) and then also click on the Rsync icon and do likewise for each share. (I use read/write so it is easier to change direction).
Then on the left side click on the Backup button. In the pull down menu click on "Add a New Backup Job". Assuming that you will "pull" the data from the Duo to the Ultra 2 Plus, your first step in the new backup job should look like the image below, with the exception that you will want to use "Remote: NFS Server" for the first backup. The host is either the NAS name or IP address of the NAS holding the files you want to pull over, and the path is the share name. You will need to set the share up on the destination (Ultra 2 Plus) before doing this, if it is not already set up.
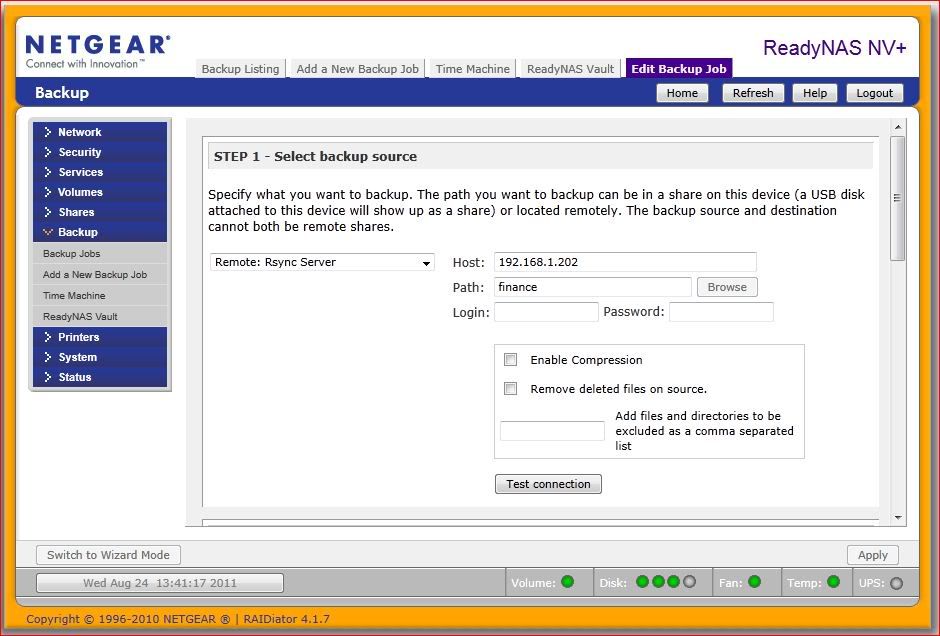
Once you have Step 1 filled out, click the "test connection" button to determine if the settings are correct.
Then in step two, in the pull down menu for the first blank, select "Share:xxx" where xxx is the name of the share you want the files to go to. While you can put them anywhere, it is far easier to match the setup of the Duo. Leave the rest of the blanks empty. There is no need to click on test connection and in fact it should be grayed out. The only shares that will appear in the pull down menu are valid shares on the Ultra 2 Plus.
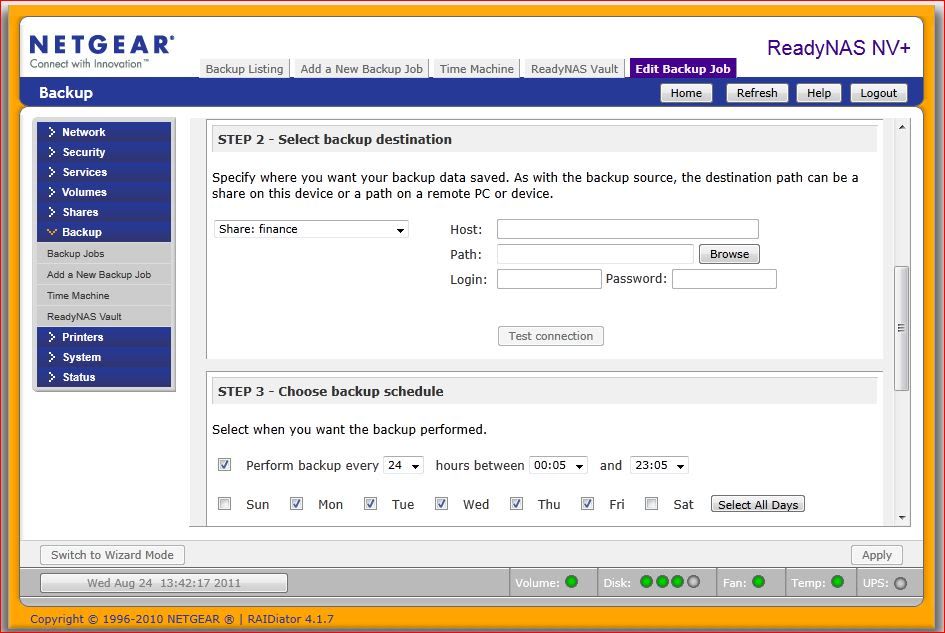
Then click on apply. This should then take you back to the listing of backup jobs and the job you just set up should be job 001. On the right hand side of the line for Job 001 you should have a button marked "GO". This is a manual run button, and when you click on it, it will run the backup now. Unless you want to set up other backup jobs, I would click on it now and run the job. It will take several hours. I recently did this to copy a share containing a lot of files I was needing for a training session, so I set up my NV+ with two drives and copied a share with 55GB in it. It took two hours and two minutes.
Then change the source to "Remote"Rsysnc Server" for Job 001, test the connection again, and then manually run the job. Rsync is incredibly fast for incremental backups as it synchronizes the shares between two NAS units. For reference, since it had to set up the files it used, it took 41 seconds to synchronize that same 55 GB share, rather than the normal 5-10 seconds on most nights.
When everything has been copied over and verified with rsync, you can change the source from Duo to Ultra 2 Plus and the destination from Ultra 2 Plus, and manually run the rsync job again. If you want to erase files on the Duo that have been deleted from the Ultra 2 Plus when you run the backup job, click the box to do so on the destination step. Also set the backup times to schedule the backups. Mine start running at midnight.
This has been a little lengthy, but I hope I covered it for you If you have questions, feel free to ask.
You will need the names or IP addresses of the two. For this reason among others, I always set a static IP address on my units. I set up up high in the range so as to not interfere with the DHCP assignments of the router. The router should skip over static IP addresses on devices, but why push the issue. I have three units, and the fourth number in the sequence, I have set to 201 for the primary NVX, 202 for the backup and 203 for my NV+. When added to the subnet of 192.168.1, my primary unit is thus 192.168.1.201.
Before setting up the backup job, go into Frontveiw on the Ultra 2 Plus and click on the "Shares" button. In the listing of shares, ensure that your shares match the shares you have set up on the Duo. You will have the default CIFS set up, but then click on the NFS icon and change it from disabled to read/write (or just write) and then also click on the Rsync icon and do likewise for each share. (I use read/write so it is easier to change direction).
Then on the left side click on the Backup button. In the pull down menu click on "Add a New Backup Job". Assuming that you will "pull" the data from the Duo to the Ultra 2 Plus, your first step in the new backup job should look like the image below, with the exception that you will want to use "Remote: NFS Server" for the first backup. The host is either the NAS name or IP address of the NAS holding the files you want to pull over, and the path is the share name. You will need to set the share up on the destination (Ultra 2 Plus) before doing this, if it is not already set up.
Once you have Step 1 filled out, click the "test connection" button to determine if the settings are correct.
Then in step two, in the pull down menu for the first blank, select "Share:xxx" where xxx is the name of the share you want the files to go to. While you can put them anywhere, it is far easier to match the setup of the Duo. Leave the rest of the blanks empty. There is no need to click on test connection and in fact it should be grayed out. The only shares that will appear in the pull down menu are valid shares on the Ultra 2 Plus.
Then click on apply. This should then take you back to the listing of backup jobs and the job you just set up should be job 001. On the right hand side of the line for Job 001 you should have a button marked "GO". This is a manual run button, and when you click on it, it will run the backup now. Unless you want to set up other backup jobs, I would click on it now and run the job. It will take several hours. I recently did this to copy a share containing a lot of files I was needing for a training session, so I set up my NV+ with two drives and copied a share with 55GB in it. It took two hours and two minutes.
Then change the source to "Remote"Rsysnc Server" for Job 001, test the connection again, and then manually run the job. Rsync is incredibly fast for incremental backups as it synchronizes the shares between two NAS units. For reference, since it had to set up the files it used, it took 41 seconds to synchronize that same 55 GB share, rather than the normal 5-10 seconds on most nights.
When everything has been copied over and verified with rsync, you can change the source from Duo to Ultra 2 Plus and the destination from Ultra 2 Plus, and manually run the rsync job again. If you want to erase files on the Duo that have been deleted from the Ultra 2 Plus when you run the backup job, click the box to do so on the destination step. Also set the backup times to schedule the backups. Mine start running at midnight.
This has been a little lengthy, but I hope I covered it for you If you have questions, feel free to ask.
Related Content
NETGEAR Academy

Boost your skills with the Netgear Academy - Get trained, certified and stay ahead with the latest Netgear technology!
Join Us!
