NETGEAR is aware of a growing number of phone and online scams. To learn how to stay safe click here.
Forum Discussion
dtsui
Jun 30, 2012Aspirant
Stuck Disk Tray on ReadyNAS Duo
I need to upgrade my hard disks on my ReadyNAS Duo but the disk tray latch could not be released by pressing the button possibly due to accumulation of much dust and fluff, the button simply could not be pushed in. I read a previous post about using a paperclip pin to push into the hole in the middle of the button to release the latch but it did not work. There is apparently another trick 'B' but but the photo attached to that post is already lost and I could not locate the other hole mentioned in the post. Anyone knows the trick and the location of the other hole? Mine is a ReadyNAS Duo.
6 Replies
Replies have been turned off for this discussion
 rccolemanAspirantMy advice is to try harder at the first approach :). I like to use a pushpin because it's long enough and it's easier to apply pressure with the plastic handle. Try various holes toward the right of the tray, stick the pin in the hole and apply downward pressure. Eventually it'll go.
Then I recommend working the latch over and over to wear down the plastic piece that's causing the stiffness. PapaBear1ApprenticeThe small paperclip will just bend, the bigger heavy duty paper clip might work, but I use a very tiny screwdriver.
Here is the image I believe you were looking for: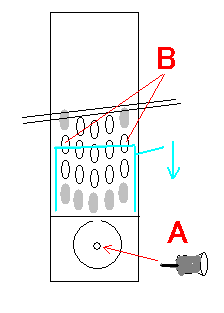
If you look through the holes marked B on the image (you may need a flashlight) you can just see the top of the release block. I insert a small screwdriver in the hole and lift on the back of the screwdriver which puts downward pressure on the tip (the top of the hole acts as the fulcrum). Pushing the top of the release block down, releases the latch. ReadySECUREApprenticeAnd here is PapaBears solution in action. http://youtu.be/zKczCPiqc-4?t=41s
- PapaBear1ApprenticeThank you for the YouTube video. It makes it a lot easier to show it than to try and describe it.
 NajninAspirant
PapaBear wrote: The small paperclip will just bend, the bigger heavy duty paper clip might work, but I use a very tiny screwdriver.
Here is the image I believe you were looking for:
If you look through the holes marked B on the image (you may need a flashlight) you can just see the top of the release block. I insert a small screwdriver in the hole and lift on the back of the screwdriver which puts downward pressure on the tip (the top of the hole acts as the fulcrum). Pushing the top of the release block down, releases the latch.
I think that's exactly he looked for and thanks for post it.
And to look this image he might must need a flashlight. achjimmyAspirantThanks for the tip here. I found out I couldn't get one of the drives out last year during the bushfires! I just spent 5 mins lubricating the back of the button and that slide with silicon spray. freed up the button very nicely.
Related Content
NETGEAR Academy

Boost your skills with the Netgear Academy - Get trained, certified and stay ahead with the latest Netgear technology!
Join Us!
